I like making computers do stuff. I find that getting a computer to do what I
want it to produces a tremendously
empowering feeling. I think
Python is a great language to use to tell computers
what to do.
In my experience, the most empowering feeling (albeit often, admittedly, not
the most useful or practical one) is making one’s own computer do something
cool. But due to various historical accidents, the practical bent of the
Python community mainly means that we get “server-side” or “cloud” computers to
do things: in other words, “other people’s computers”.
If you, like me, are a metric standard tech industry hipster, “your own
computer” means “macOS”. Many of us have written little command-line tools to
automate things, and thank goodness macOS is enough of a UNIX that that works
nicely - and it’s often good enough. But sometimes, you just want to press a
button and have a thing happen; sometimes a character grid isn’t an expressive
enough output device. Sometimes you want to be able to take that same logical
core, or some useful open source code, that
you would use in the cloud, and instead, put it into an app. Sometimes you
want to be able to learn about writing desktop apps while leveraging your
existing portfolio of skills. I have done some of this, and intend to do more
of it at
work,
and so I’d like to share with you some things I’ve learned about how to do it.
Back when I was a Linux user, this was a fairly simple proposition. All the
world was GTK+ back then, in the blissful interlude between the ancient
inconsistent mess when everything was Xt or Motif or Tk or Swing or XForms, and
the modern inconsistent mess where everything is Qt or WxWidgets or Swing or
some WebKit container with its own pile of gross stylesheet fruit salad.
If you had a little script that you wanted to put a GUI on back then, the
process for getting started was apt-get install python-gtk and then just to
do something like
| import gtk
w = gtk.Window("My Window")
b = gtk.Button("My Button")
w.add(b)
gtk.main()
|
and you were pretty much off to the races. If you wanted to, you could load a
UI file that you made with glade, if you had some
complicated fancy stuff to display, but that was optional and reasonably
straightforward to use. I used to do that all the time, for various personal
computing tasks. Of course, if I did that today, I’m sure
they’d all laugh at me.
So today I’d like to show you how to do the same sort of thing with macOS.
To be clear, this is not a tutorial in Objective C, or a deep dive into Mac
application programming. I’m going to make some assumptions about your skills:
you’re a relatively experienced Python programmer, you’ve done some
introductory Xcode material like the
Temperature Converter
tutorial, and you either already know or don’t mind figuring out
the PyObjC bridged method naming conventions
on your own.
If you are starting from scratch, and you don’t have any code yet, and you want
to work in Objective C or Swift, the modern macOS development experience is even
smoother than what I just described. You don’t need to install any “packages”,
just Xcode, and you have a running app before you’ve written a single line of
code, because it will give you a working-by-default template.
The problem is, if you’re a Python developer just trying to make a little
utility for your own use, once you’ve got this lovely Objective C or Swift
application ready for you to populate with interesting stuff, it’s a really
confusing challenge to get your Python code in there. You can drag the
Python.framework from homebrew into Xcode and then start trying to call some
C functions like PyRun_SimpleString to get your program bootstrapped, but
then you start running into tons of weird build issues. How do you copy your
scripts to the app bundle? How do you invoke distutils? What about shared
libraries that you’ve linked against? It’s hard enough to try to jam anything
like setuptools or pip into the Xcode build system that you might as well give
up and rewrite the logic; it’ll be less effort.
If you’re a Python developer you probably expect tools like
virtualenv and
pip to “just work”. You expect to be able
to put a file into a folder and then import it without necessarily writing a
whole build toolchain first. And if you haven’t worked with it a lot, you
probably find Xcode’s UI bewildering. Not to mention the fact that you
probably already have a text editor that you like already, and don’t want to
spend a bunch of time coming up to speed on a new one just to display a button.
Luckily, of course, there’s pyobjc,
which lets you write your whole application in Python, skipping the whole Xcode
/ Objective C / Swift side-show and just add a little UI logic. The problem
I’m trying to address here is that “just adding a little UI logic” (rather than
designing your program from the ground up as an App) in the Cocoa / ObjC
universe is
famously and maddeningly obscure.
gtk.Window() is a reasonably straightforward first function to call;
[[NSWindow alloc] initWithContentRect:styleMask:backing:defer:] not so much.
This is not even to mention the fact that all the documentation, all the
tutorials, and all the community resources pretty much expect you to be working
with .xibs or storyboards inside the Interface Builder portion of Xcode, and
you’re really on your own if you are trying to do everything outside of that.
py2app can help with some of the build
issues, but it has
its own problems you
probably don’t want to be
tackling if you’re just getting
started; it’ll sap all your energy for actually coding.
I should mention before we finally dive in here that if you really just want
to display a button, a text area, maybe a few fields,
Toga is probably a better option for you than
the route that I'm describing in this post; it's certainly a lot less work.
What I am assuming here is that you want to be able to present a button at
first, but gradually go on to mess around with arbitrary other macOS native APIs
to experiment with the things you can do with a desktop that you can't do in
the cloud, like displaying local
notifications,
tracking your
location,
recording the
screen,
controlling other applications,
and so on.
So, what is an enterprising developer - who is still lazy enough for my
rhetorical purposes here - to do? Surprisingly enough, I have a suggestion!
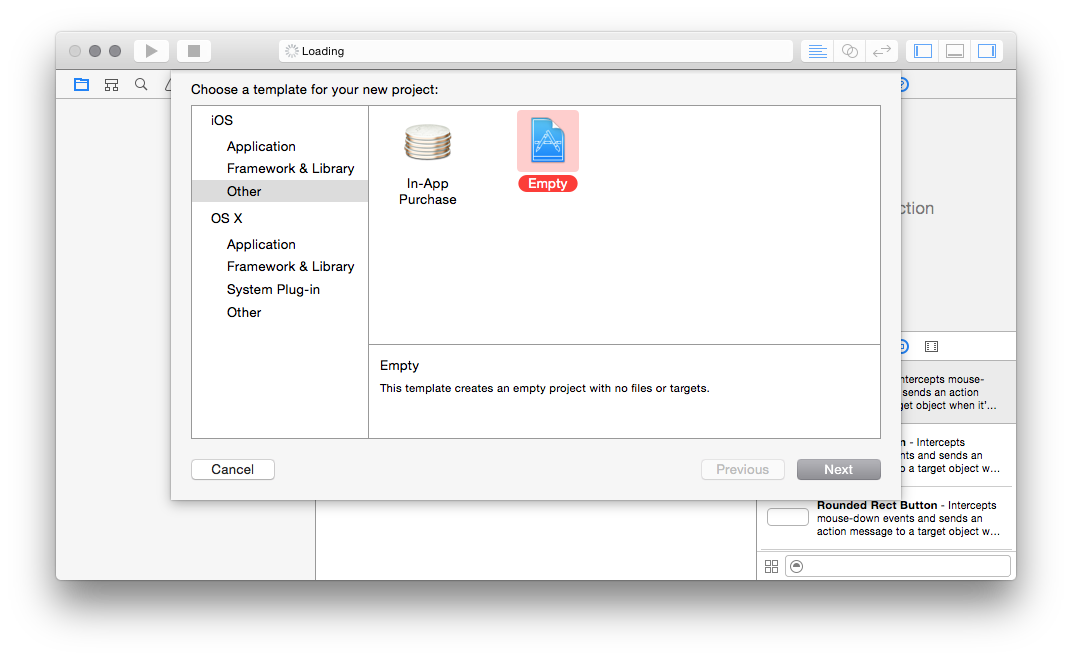
First, you want to make a new, empty Xcode project. So fire up Xcode, go to
File, New, Project, and then:

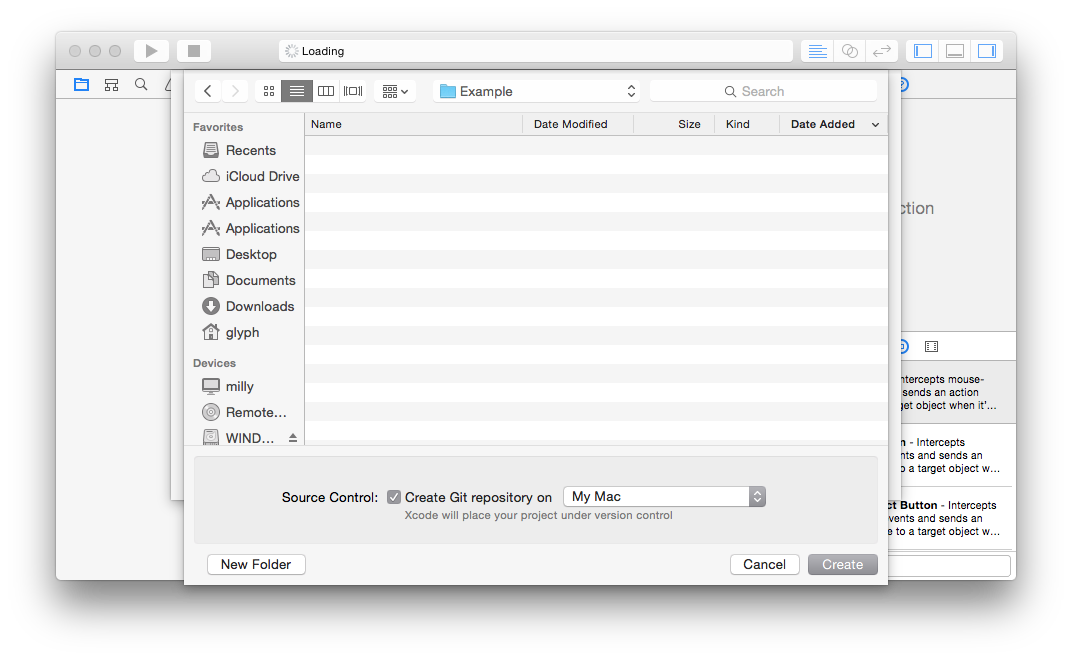
Go ahead and give it a Git repository:
Now that you’ve got a shiny new blank project, you’ll need to create two
resources in it: one, a user interface document, and the other, a Python file.
So select File, New, and then choose macOS, User Interface, Empty:
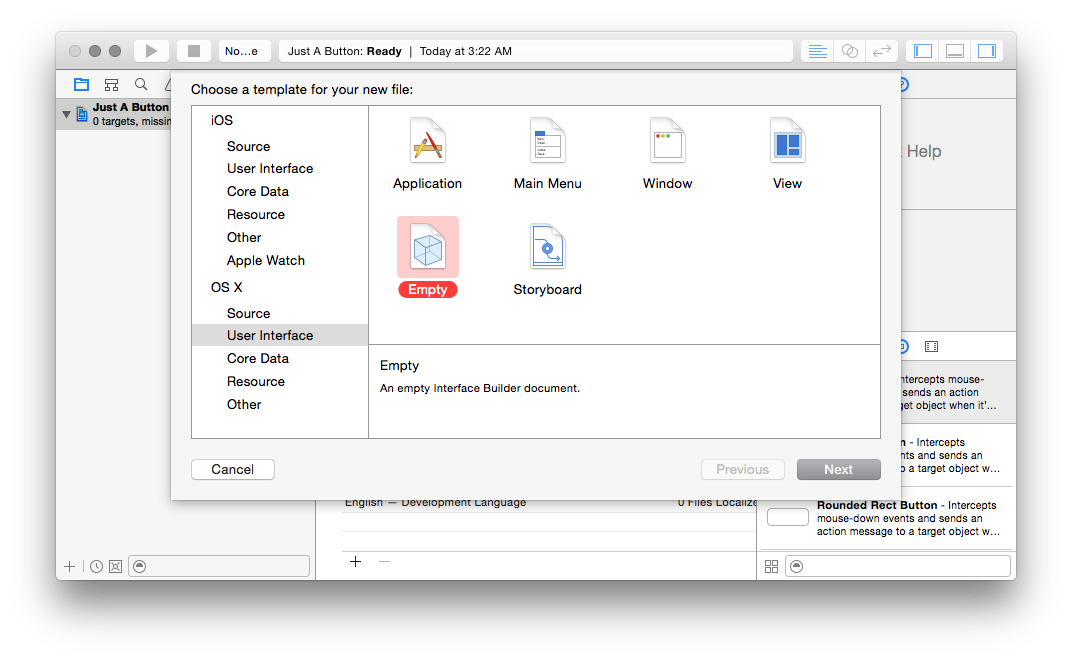
I’m going to call this “MyUI”, but you can call it whatever:
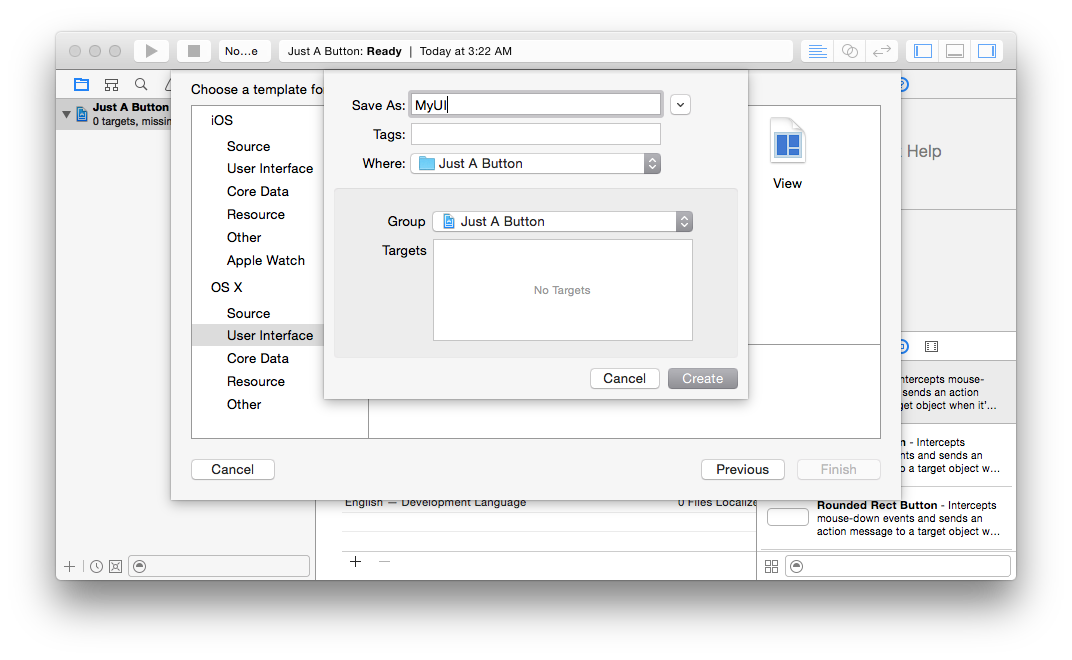
As you can see, this creates a MyUI.xib file in your project, with nothing in
it.
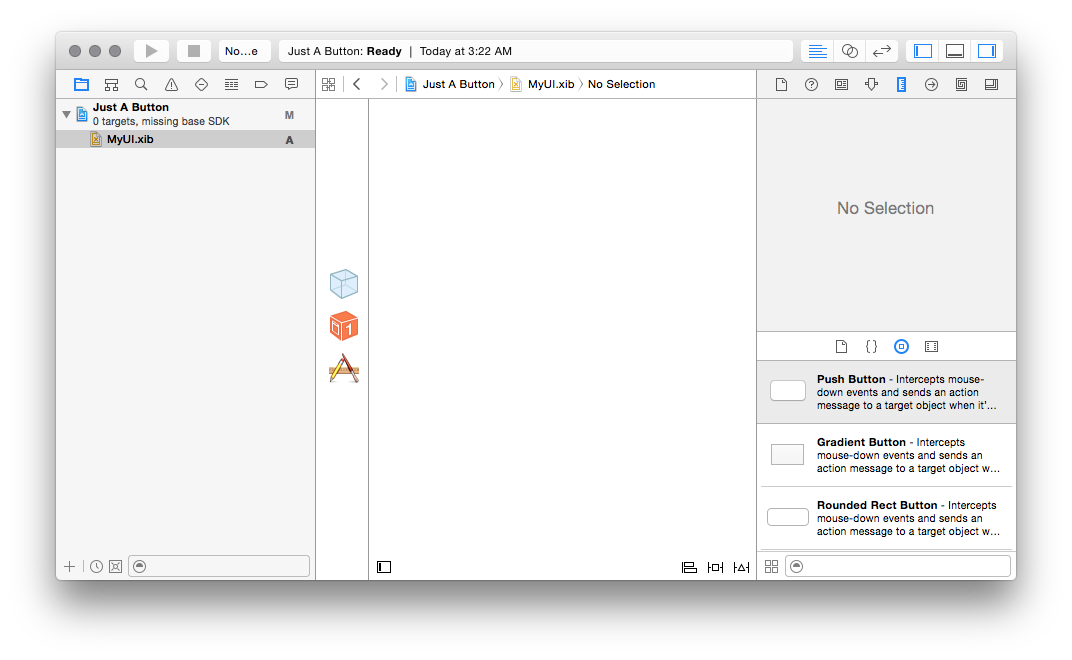
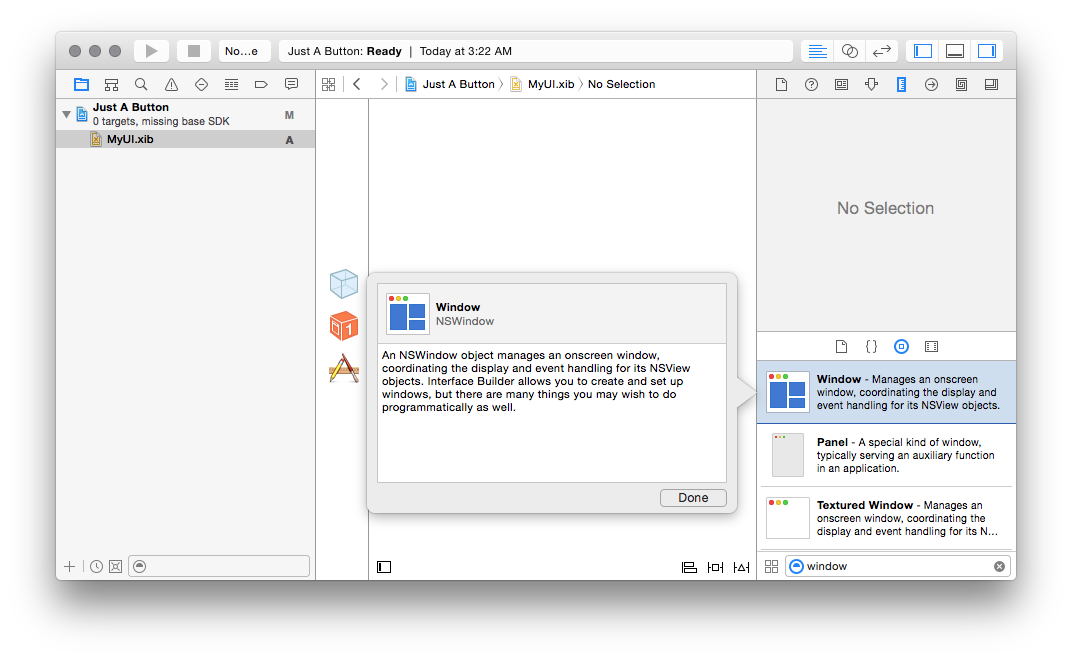
We want to put a window and a button into it, so, let’s start with that.
Search for “window” in the bottom right, and drag the “Window” item onto the
canvas in the middle:
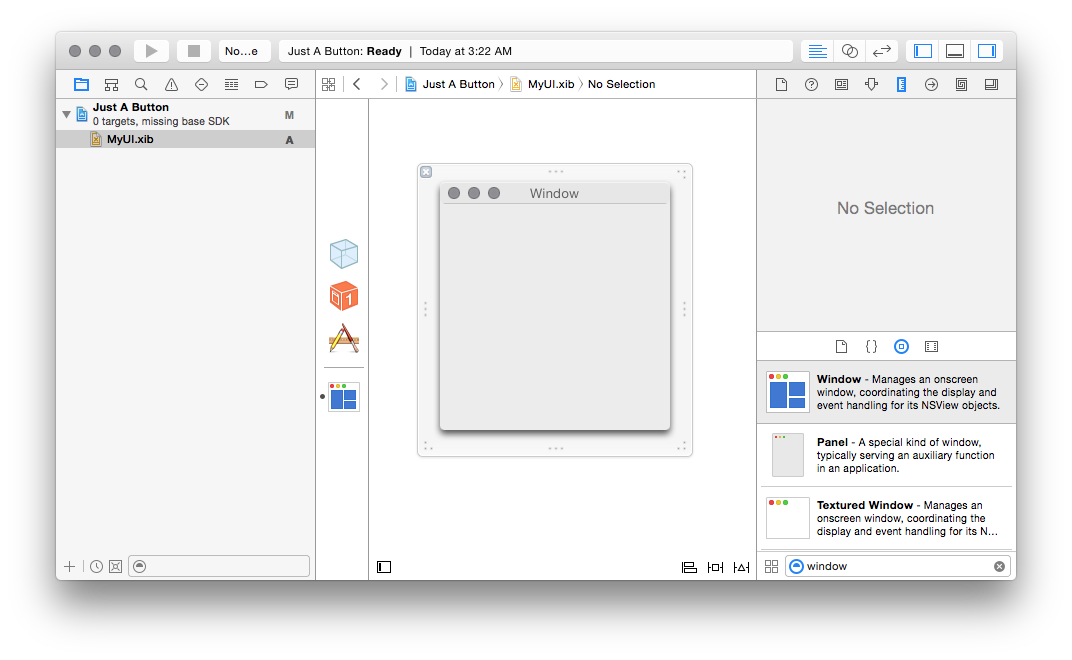
Now we’ve got a UI file which contains a window. How can we display it?
Normally, Xcode sets all this up for you, creating an application bundle, a
build step to compile the .xib into a .nib, to copy it into the appropriate
location, and code to load it for you. But, as we’ve discussed above, we’re
too lazy for all that. Instead, we’re going to create a Python script that
compiles the .xib automatically and then loads it.
You can do this with your favorite text editor. The relevant program looks
like this:
1
2
3
4
5
6
7
8
9
10
11
12 | import os
os.system("ibtool MyUI.xib --compile MyUI.nib")
from Foundation import NSData
from AppKit import NSNib
nib_data = NSData.dataWithContentsOfFile_(u"MyUI.nib")
(NSNib.alloc().initWithNibData_bundle_(nib_data, None)
.instantiateWithOwner_topLevelObjects_(None, None))
from PyObjCTools.AppHelper import runEventLoop
runEventLoop()
|
Breaking this down one step at a time, what it’s doing is:
| import os
os.system("ibtool MyUI.xib --compile MyUI.nib")
|
We run Interface Builder Tool, or ibtool, to convert the xib, which is a
version-control friendly, XML document that Interface Builder can load, into a
nib, which is a binary blob that AppKit can load at runtime. We don’t want
to add a manual build step, so for now we can just have this script do its own
building as soon as it runs.
Next, we need to load the data we just compiled:
| nib_data = NSData.dataWithContentsOfFile_(u"MyUI.nib")
|
This needs to be loaded into an NSData because that’s how AppKit itself
wants it prepared.
Finally, it’s time to load up that window we just drew:
| (NSNib.alloc().initWithNibData_bundle_(nib_data, None)
.instantiateWithOwner_topLevelObjects_(None, None))
|
This loads an NSNib (the “ib” in its name also refers to “Interface
Builder”) with the init... method, and then creates all the objects inside
it - in this case, just our Window object - with the instantiate... method.
(We don’t care about the bundle to use, or the owner of the file, or the top
level objects in the file yet, so we are just leaving those all as None
intentionally.)
Finally, runEventLoop() just runs the event loop, allowing things to be
displayed.
Now, in a terminal, you can run this program by creating a virtualenv, and
doing pip install pyobjc-framework-Cocoa, and then python button.py. You
should see your window pop up - although it will not take focus.
Congratulations, you’ve made a window pop up!
One minor annoyance: you’re probably used to interrupting programs with ^C on
the command line. In this case, the PyObjC helpers catch that signal, so
instead you will need to use ^\ to hard-kill it until we can hook up some
kind of “quit” functionality. This may cause crash dialogs to pop up if you
don’t use virtualenv; you can just ignore them.
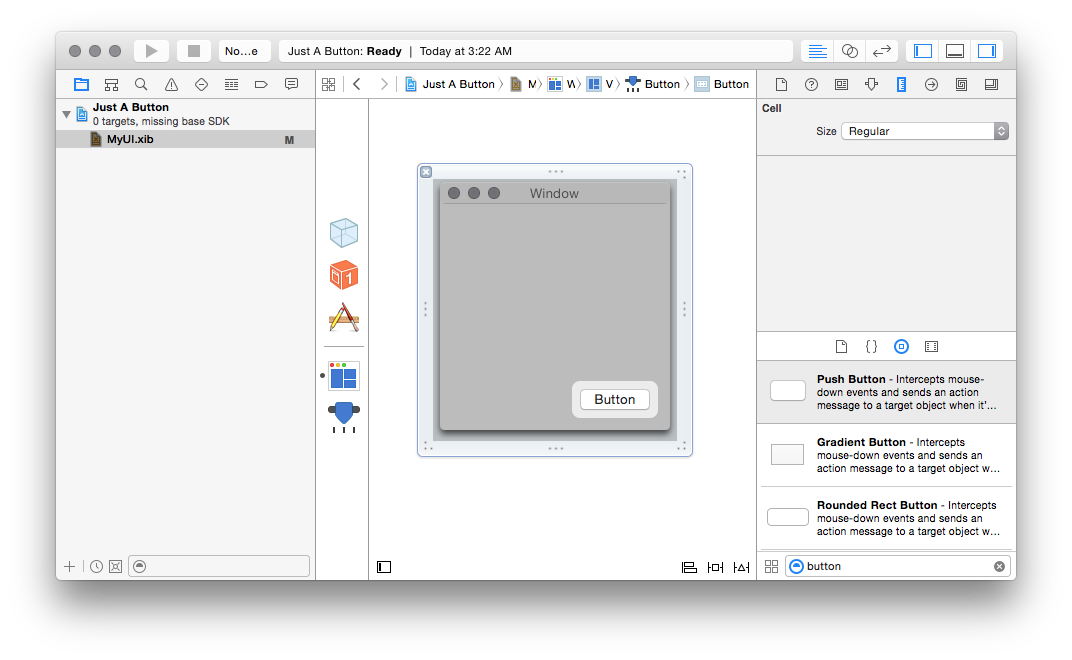
Of course, now that we’ve got a window, we probably want to do something with
it, and this is where things get tricky. First, let’s just create a button;
drag the button onto your window, and save the .xib:
And now, the moment of truth: how do we make clicking that button do
anything? If you’ve ever done any Xcode tutorials or written ObjC code, you
know that this is where things get tricky: you need to control-drag an action
to a selector. It figures out which selectors are available by magically
knowing things about your code, and you can’t just click on a thing in the
interface-creation component and say “trust me, this method exists”. Luckily,
although the level of documentation for it these days makes it on par with an
easter egg, Xcode has support for doing this with Python classes just as it
does with Objective C or Swift classes.
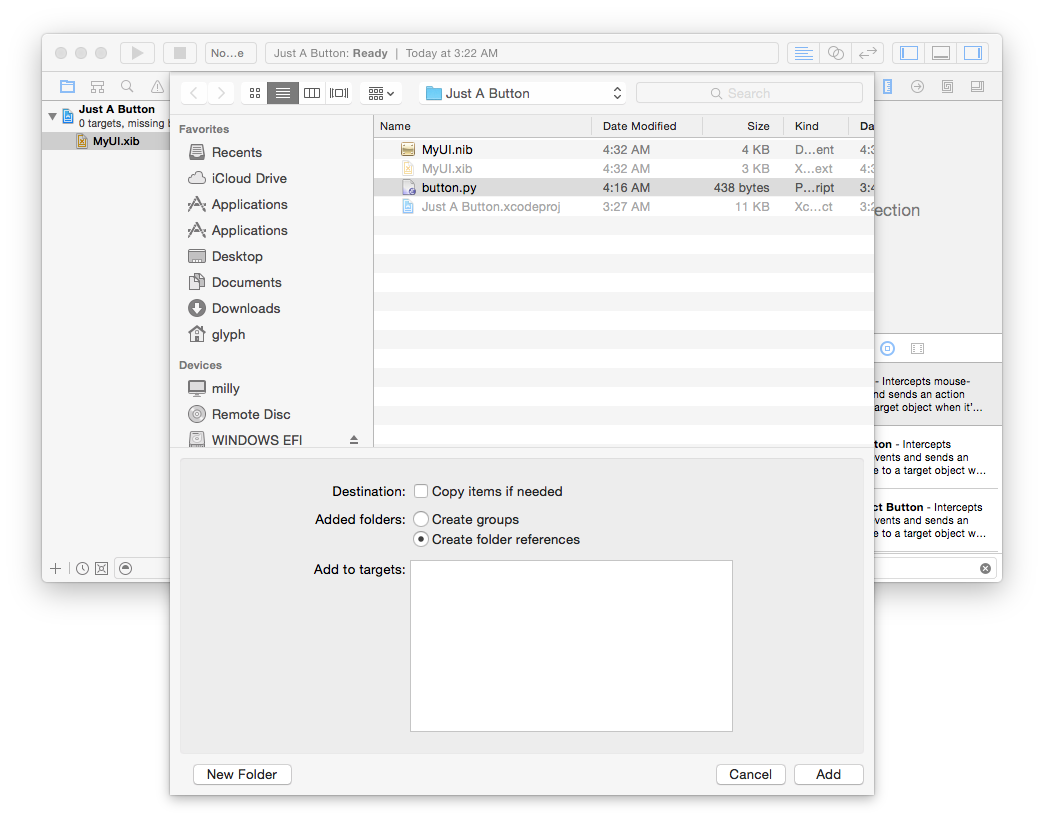
First though, we’ll need to tell Xcode our Python file exists. Go to the
“File” menu, and “Add files to...”, and then select your Python file:
Here’s the best part: you don’t need to use Xcode’s editor at all; Xcode will
watch that file for changes. So keep using your favorite text editor and
change button.py to look like this:
 1
 2
 3
 4
 5
 6
 7
 8
 9
10
11
12
13
14
15
16
17
18
19
20 | import os
os.system("ibtool MyUI.xib --compile MyUI.nib")
from objc import IBAction
from Foundation import NSObject, NSData
from AppKit import NSNib
class Clicker(NSObject):
@IBAction
def clickMe_(self, sender):
print("Clicked!")
the_clicker = Clicker.alloc().init()
nib_data = NSData.dataWithContentsOfFile_(u"MyUI.nib")
(NSNib.alloc().initWithNibData_bundle_(nib_data, None)
.instantiateWithOwner_topLevelObjects_(the_clicker, None))
from PyObjCTools.AppHelper import runEventLoop
runEventLoop()
|
In other words, add a Clicker subclass of NSObject, give it a clickMe_
method decorated by objc.IBAction, taking one argument, and then make it do
something you can see, like print something. Then, make a global instance of
it, and pass it as the owner parameter to NSNib.
At this point it would probably be good to explain a little about what the
“file’s owner” is and how loading nibs works.
When you instantiate a Nib in AppKit, you are creating a collection of
graphical objects, connected to an object in your program that you construct.
In other words, if you had a program that displayed a Person, you’d have a
Person.nib and a Person class, and each time you wanted to show a Person you’d
instantiate the Nib again with the new Person as the owner of that Nib. In
the interface builder, this is represented by the “file’s owner” placeholder.
I am explaining this because if you’re interested in reading this article,
you’ve probably been interested enough in macOS programming to do something like
the aforementioned
Temperature Converter
tutorial, but such tutorials almost universally just use the single default
“main” nib that gets loaded when the application launches, so although they
show you how to do many different things with UI elements, it’s not clear how
the elements got there. This, here, is how you make new UI elements get
there in the first place.
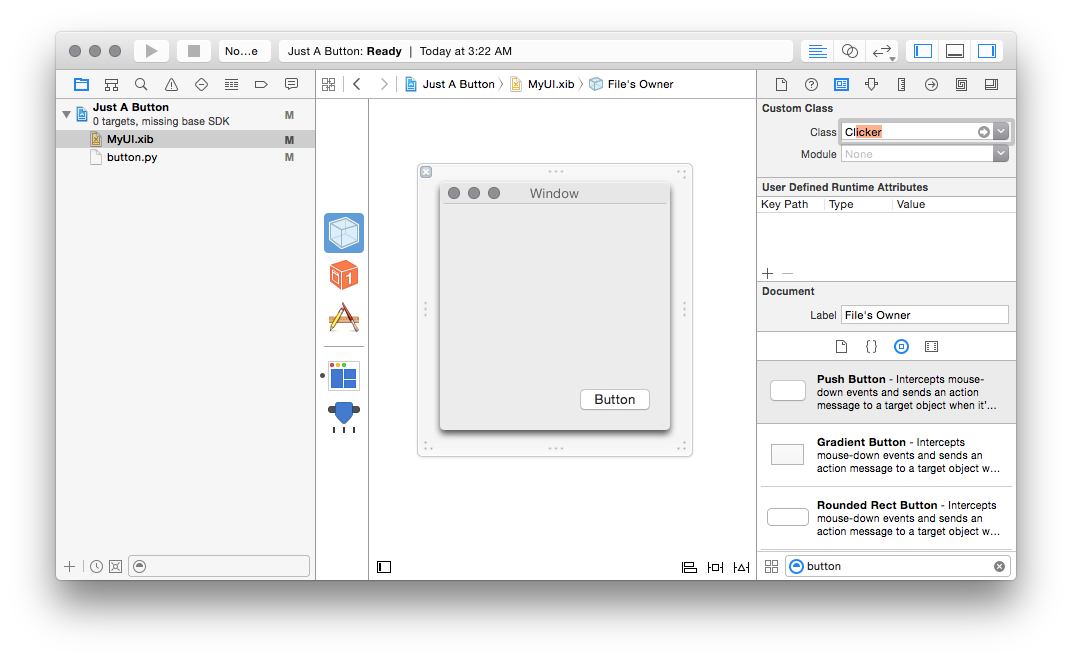
Back to our clicker example: now that we have a class with a method, we need to
tell Xcode that the clicking the button should call that method. So what
we’re going to tell Xcode is that we expect this Nib to be owned by an
instance of Clicker. To do this, go to MyUI.xib and select the “File’s
Owner” (the thing that looks like a transparent cube), to to the “Identity
Inspector” (the tiny icon that looks like a driver’s license on the right) and
type “Clicker” in the “Class” field at the top.
If you’ve properly added button.py to your project and declared that class
(as an NSObject), it should automatically complete as you start typing the
name:
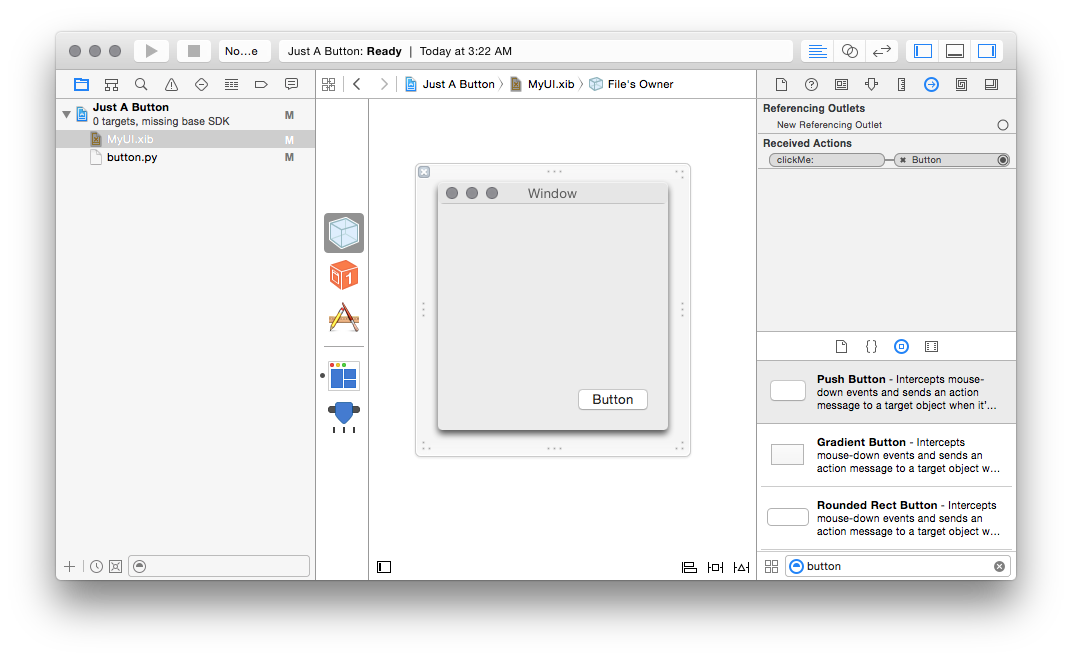
Now you need to connect your clickMe action to the button you already
created. If you’ve properly declared your method as an IBAction, you should
see it in the list of “received actions” in the “Connections Inspector” of the
File’s Owner (the tiny icon that looks like a right-pointing arrow in a
circle):

Drag from the circle to the right of the clickMe: method there to the button
you’ve created, and you should see the connection get formed:
If you save your xib at this point and re-run your python file, you should be
able to click on the button and see something happen.
Finally, we want to be able to not just get inputs from the GUI, but also
produce outputs. To do this, we want to populate an outlet on our Clicker
class with a pointer to an object in the Nib. We can do this by declaring a
variable as an objc.IBOutlet(); simply add a from objc import IBOutlet, and
change Clicker to read:
| class Clicker(NSObject):
label = IBOutlet()
@IBAction
def clickMe_(self, sender):
self.label.setStringValue_(u"\N{CHECK MARK}")
|
In case you’re wondering where setStringValue_ comes from, it’s a method on NSTextField, since labels are NSTextFields.
Then we can place a label into our xib; and we can see it is in fact an
NSTextField in the Identity Inspector:
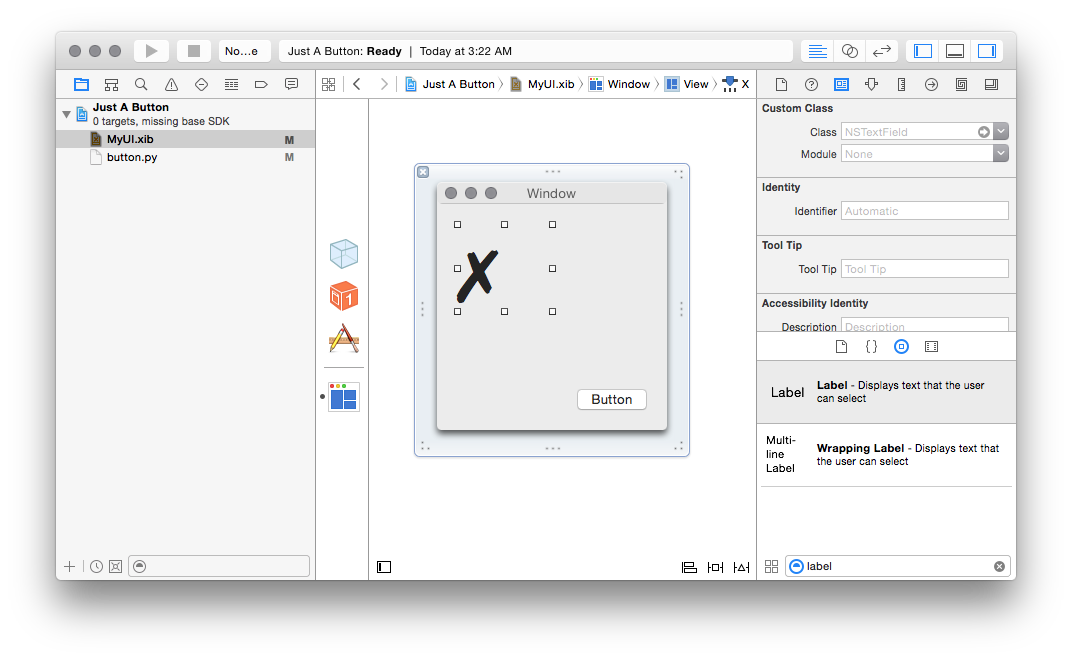
I’ve pre-filled mine out with a unicode “BALLOT X” character, for style points.
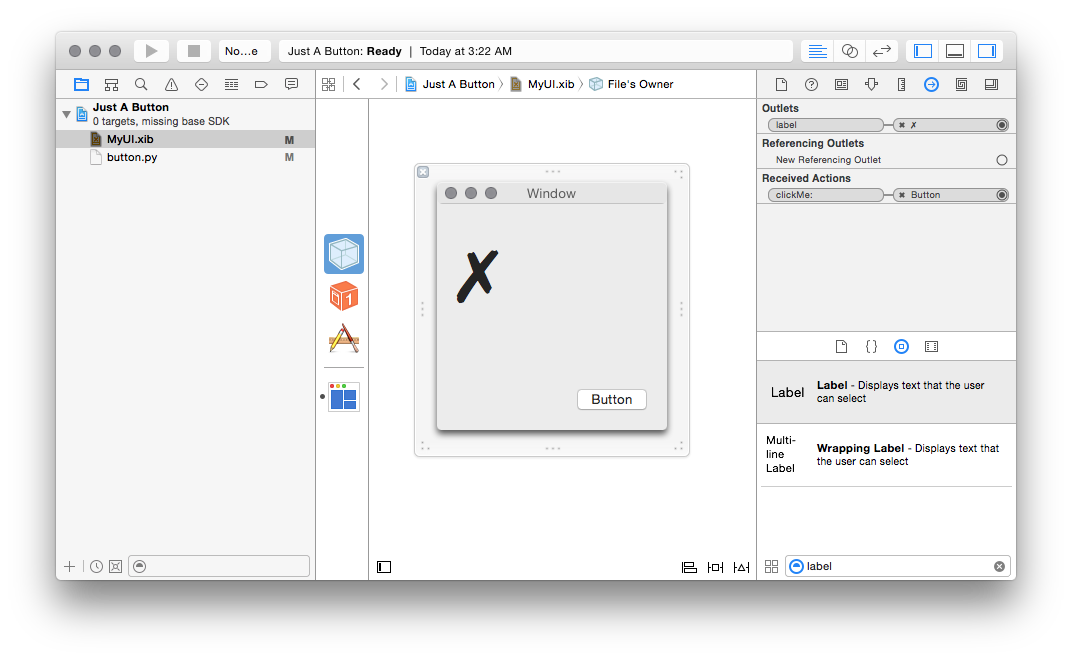
Then, we just need to make sure that the label attribute of Clicker
actually points at this value; once again, select the File’s Owner, the
Connections Inspector, and (if you declared your IBOutlet correctly), you
should see a new “label” outlet. Drag the little circle to the right of that
outlet, to the newly-created label object, and you should see the linkage in
the same way the action was linked:
And there you have it! Now you have an application that can open a window,
take input, and display output.
This is, as should be clear by now, not really the preferred way of making an
application for macOS. There’s no app bundle, so there’s nothing to code-sign.
You’ll get weird behavior in certain cases; for example, as you’ve probably
already noticed, the window doesn’t come to the front when you launch the app
like you might expect it to. But, if you’re a Python programmer, this should
provide you with a quick scratch pad where you can test ideas, learn about how
interface builder works, and glue a UI to existing Python code quickly before
wrestling with complex integration and distribution issues.
Speaking of interfacing with existing Python code, of course you wouldn’t come
to this blog and expect to get technical content without just a little bit
of Twisted in it. So here’s how you hook up Twisted to an macOS GUI: instead of
runEventLoop, you need to run your application like this:
| # Before importing anything else...
from PyObjCTools.AppHelper import runEventLoop
from twisted.internet.cfreactor import install
reactor = install(runner=runEventLoop)
# ... then later, when you want to run it ...
reactor.run()
|
In your virtualenv, you’ll want to pip install 'twisted[macos_platform]' to get
all the goodies for macOS, including the GUI integration. Since all Twisted
callbacks run on the main UI thread, you don’t need to know anything special to
do stuff; you can call methods on whatever UI objects you have handy to make
changes to them.
Finally, although I definitely don’t have room in this post to talk about all
the edge cases here, I will address two particularly annoying ones; often if
you’re writing a little app like this, you really want it to take keyboard
focus, and by default this window will come up in the background. To fix that,
you can do this right before starting the main loop:
| from AppKit import NSApplication, NSApplicationActivationPolicyAccessory
app = NSApplication.sharedApplication()
app.setActivationPolicy_(NSApplicationActivationPolicyAccessory)
app.activateIgnoringOtherApps_(True)
|
And also, closing the window won’t quit the application, which might be pretty
annoying if you want to get back to using your terminal, so a quick fix for
that is:
| class QuitWhenClosed(NSObject):
def applicationShouldTerminateAfterLastWindowClosed_(self, app):
return True
app.setDelegate_(QuitWhenClosed.alloc().init().retain())
|
(the “retain” is necessary because ObjC is not a garbage collected language,
and app.delegate is a weak reference, so the QuitWhenClosed would be
immediately freed (and there would be a later crash) if you didn’t hold it in a
global variable or call retain() on it.)
You might have
other problems
with this technique, and this post definitely can’t fit solutions to all of
them, but now that you can load a nib, create classes that interface builder
can understand, and run a Twisted main loop, you should be able to use the
instructions in other tutorials and resources relatively straightforwardly.
Happy hacking!
(Thanks to everyone who helped with this post. Of course my errors are
entirely my own, but thanks especially to Ronald Oussoren for his tireless work
on pyObjC and py2app over the years, as well as to Mark Eichin and Amber Brown
for some proofreading and feedback before this was posted.)